HTML5 Pendahuluan
Apa yang Baru di HTML5?
Deklarasi DOCTYPE untuk HTML5 sangat sederhana:
<!DOCTYPE html>
Pengkodean karakter (charset) deklarasi juga sangat sederhana:
<meta charset="UTF-8">
HTML5 Contoh:
<!DOCTYPE html>
<html>
<head>
<meta charset="UTF-8">
<title>Title of the document</title>
</head>
<body>
Content of the document......
</body>
</html>
 Pengkodean karakter default di HTML5 adalah UTF-8.
Baru HTML5 Elemen
Unsur-unsur baru yang paling menarik adalah:
New semantik unsur-unsur seperti <header>, <footer>, <article>, dan <section>.
Bentuk baru kontrol atribut seperti nomor, tanggal, waktu, kalender, dan jangkauan.
New grafis elemen: <svg> dan <canvas>.
New multimedia elemen: <audio yang> dan <video>.
 Dalam bab HTML5 Support, Anda akan belajar bagaimana "mengajar" browser lama untuk menangani HTML5 semantik.
New HTML5 API (Application Programming Interfaces)
Yang paling menarik baru API adalah:
HTML GeolocationHTML Drag dan DropHTML Penyimpanan LokalHTML Aplikasi CachePekerja Web HTMLHTML SSE
 Penyimpanan lokal adalah pengganti yang kuat untuk cookies.
Elemen Dihapus di HTML5
Unsur-unsur HTML4 berikut telah dihapus dari HTML5:
ElemenMenggunakan bukan<acronym><abbr><applet><object><basefont>CSS<big>CSS<center>CSS<dir><ul><font>CSS<frame> <frameset> <noframes> <strike>CSS<tt>CSS
 Dalam bab HTML5 Migrasi, Anda akan mempelajari cara mudah bermigrasi dari HTML4 ke HTML5.
HTML Sejarah
Sejak hari-hari awal web, ada banyak versi HTML:
VersionYearTim Berners-Lee invented www1989Tim Berners-Lee invented HTML1991Dave Raggett drafted HTML+1993HTML Working Group defined HTML 2.01995W3C Recommended HTML 3.21997W3C Recommended HTML 4.011999W3C Recommended XHTML 1.02000HTML5 WHATWG First Public Draft2008HTML5 WHATWG Living Standard2012HTML5 W3C Final Recommendation2014
Tim Berners-Lee menciptakan "World Wide Web" pada tahun 1989, dan internet melepas pada 1990-an.
Dari tahun 1991 hingga 1998, HTML dikembangkan dari versi 1 ke versi 4.
Pada tahun 2000, World Wide Web Consortium (W3C) merekomendasikan XHTML 1.0.
XHTML sintaks adalah ketat, dan pengembang dipaksa untuk menulis sah dan "well-formed" kode.
Pada tahun 2004, WHATWG (Kelompok Kerja Teknologi Web Hypertext Application) dibentuk sebagai jawaban untuk memperlambat perkembangan W3C, dan keputusan W3C untuk menutup pengembangan HTML, mendukung XHTML.
WHATWG ingin mengembangkan HTML, konsisten dengan bagaimana web itu digunakan, sementara kompatibel dengan versi HTML.
Pada periode 2004-2006, inisiatif WHATWG mendapat dukungan oleh vendor browser utama.
Pada tahun 2006, W3C mengumumkan bahwa mereka akan mendukung WHATWG.
Pada tahun 2008, pertama HTML5 rancangan publik dirilis.
Pada 2012, WHATWG dan W3C memutuskan pemisahan:
WHATWG akan mengembangkan HTML sebagai "Living Standard".
Sebuah standar hidup tidak pernah sepenuhnya lengkap, tapi selalu diperbarui dan diperbaiki. Fitur baru dapat ditambahkan, tetapi fungsi lama tidak dapat dihapus.
The WHATWG Living Standard diterbitkan pada tahun 2012, dan terus diperbarui.
W3C akan mengembangkan HTML5 definitif dan standar XHTML5, sebagai "snapshot" dari WHATWG.
The W3C HTML5 rekomendasi dirilis Oktober 2014 28.
HTML5 didukung di semua browser modern.
Selain itu, semua browser, lama dan baru, secara otomatis menangani elemen yang belum diakui sebagai elemen inline.
Karena ini, Anda dapat "mengajar" browser lama untuk menangani "tidak diketahui" elemen HTML.
 Anda bahkan bisa mengajar IE6 (Windows XP 2001) bagaimana menangani elemen HTML tidak diketahui.
Mendefinisikan HTML5 Elemen sebagai Blok Elements
HTML5 mendefinisikan delapan baru semantik elemen HTML. Semua ini adalah blok-tingkat elemen.
Untuk mengamankan perilaku yang benar di browser lama, Anda dapat mengatur CSS display properti untuk memblokir:
header, section, footer, aside, nav, main, article, figure {
display: block;
}
Menambahkan New Elemen untuk HTML
Anda juga dapat menambahkan elemen baru ke HTML dengan trik browser.
Contoh ini menambahkan elemen baru yang disebut <myHero> ke HTML, dan mendefinisikan gaya tampilan untuk itu:
Contoh
<!DOCTYPE html>
<html>
<head>
<title>Creating an HTML Element</title>
<script>document.createElement("myHero")</script>
<style>
myHero {
display: block;
background-color: #ddd;
padding: 50px;
font-size: 30px;
}
</style>
</head>
<body>
<h1>My First Heading</h1>
<p>My first paragraph.</p>
<myHero>My First Hero</myHero>
</body>
</html>
Coba Sendiri »
JavaScript Pernyataan document.createElement ("myHero") ditambahkan, hanya untuk memuaskan IE.
Masalah Dengan Internet Explorer
Anda bisa menggunakan solusi yang dijelaskan di atas, untuk semua elemen HTML5 baru, namun:
 Internet Explorer 8 dan sebelumnya, tidak memungkinkan styling dari unsur yang tidak diketahui.
Untungnya, Sjoerd Visscher menciptakan "JavaScript HTML5 Mengaktifkan","shiv":
<!--[if lt IE 9]>
<script src="http://html5shiv.googlecode.com/svn/trunk/html5.js"></script>
<![endif]-->
Kode di atas adalah komentar, tapi versi sebelumnya untuk IE9 akan membacanya (dan mengerti).
The Shiv Solusi Lengkap
Contoh
<!DOCTYPE html>
<html>
<head>
<title>Styling HTML5</title>
<!--[if lt IE 9]>
<script src="http://html5shiv.googlecode.com/svn/trunk/html5.js"></script>
<![endif]-->
</head>
<body>
<h1>My First Article</h1>
<article>
London is the capital city of England. It is the most populous city in the United Kingdom, with a metropolitan area of over 13 million inhabitants.
</article>
</body>
</html>
Coba Sendiri »
Link ke kode shiv harus ditempatkan dalam <head> elemen, karena Internet Explorer perlu tahu tentang semua elemen baru sebelum membaca mereka.
Sebuah HTML5 Skeleton
Contoh
<!DOCTYPE html>
<html lang="en">
<head>
<title>HTML5 Skeleton</title>
<meta charset="utf-8">
<!--[if lt IE 9]>
<script src="http://html5shiv.googlecode.com/svn/trunk/html5.js">
</script>
<![endif]-->
<style>
body {font-family: Verdana, sans-serif; font-size:0.8em;}
header,nav, section,article,footer
{border:1px solid grey; margin:5px; padding:8px;}
nav ul {margin:0; padding:0;}
nav ul li {display:inline; margin:5px;}
</style>
</head>
<body>
<header>
<h1>HTML5 SKeleton</h1>
</header>
<nav>
<ul>
<li><ahref="html5_semantic_elements.asp">HTML5 Semantic</a></li>
<li><a href="html5_geolocation.asp">HTML5 Geolocation</a></li>
<li><a href="html5_canvas.asp">HTML5 Graphics</a></li>
</ul>
</nav>
<section>
<h1>Famous Cities</h1>
<article>
<h2>London</h2>
<p>London is the capital city of England. It is the most populous city in the United Kingdom,
with a metropolitan area of over 13 million inhabitants.</p>
</article>
<article>
<h2>Paris</h2>
<p>Paris is the capital and most populous city of France.</p>
</article>
<article>
<h2>Tokyo</h2>
<p>Tokyo is the capital of Japan, the center of the Greater Tokyo Area,
and the most populous metropolitan area in the world.</p>
</article>
</section>
<footer>
<p>© 2014 W3Schools. All rights reserved.</p>
</footer>
</body>
</html>
Coba Sendiri »
HTML5 Semantic Elements
«Sebelumnya
Berikutnya Bab »
Semantik adalah studi tentang makna kata-kata dan frase dalam bahasa.
Unsur semantik adalah elemen dengan makna.
Apa Unsur Semantic?
Unsur semantik jelas menggambarkan artinya untuk kedua browser dan pengembang.
Contoh non-semantik elemen: <div> dan <span> - Menceritakan apa-apa tentang isinya.
Contoh semantik elemen: <form>, <table>, dan <img> - Jelas mendefinisikan isinya.
Dukungan Browser


HTML5 elemen semantik yang didukung di semua browser modern.
Selain itu, Anda dapat "mengajar" browser lama bagaimana menangani "elemen yang tidak diketahui".
Membacanya di HTML5 Browser Dukungan.
Elemen Semantic baru di HTML5
Banyak situs web berisi kode HTML seperti: <div id = "nav"> <div class = "header"> <div id = "footer">
untuk menunjukkan navigasi, header, dan footer.
HTML5 menawarkan unsur semantik baru untuk menentukan bagian yang berbeda dari halaman web:
<article><aside><rincian><figcaption><figure><footer><header><utama><mark><nav><section><summary><time>
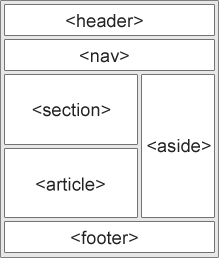
HTML5 <section> Elemen
The <section> elemen mendefinisikan bagian dalam sebuah dokumen.
Menurut HTML5 dokumentasi W3C: "bagian adalah pengelompokan tematik konten, biasanya dengan judul."
Halaman rumah Sebuah situs Web dapat dibagi menjadi beberapa bagian untuk pengenalan, konten, dan informasi kontak.
Contoh
<section>
<h1>WWF</h1>
<p>The World Wide Fund for Nature (WWF) is....</p>
</section>
Cobalah sendiri »
HTML5 <article> Elemen
<Article> elemen menentukan independen, konten mandiri.
Sebuah artikel harus masuk akal sendiri, dan itu harus mungkin untuk membacanya secara independen dari sisa situs web.
Contoh di mana <article> elemen dapat digunakan:
Posting forumBlog postingArtikel koran
Contoh
<article>
<h1>What Does WWF Do?</h1>
<p>WWF's mission is to stop the degradation of our planet's natural environment,
and build a future in which humans live in harmony with nature.</p>
</article>
Coba Sendiri »
Elemen Semantic Nesting
Dalam standar HTML5, <article> elemen mendefinisikan lengkap, blok mandiri elemen terkait.
The <section> elemen didefinisikan sebagai sebuah blok elemen terkait.
Dapatkah kita menggunakan definisi untuk memutuskan bagaimana elemen sarang? Tidak, kita tidak bisa!
Di Internet, Anda akan menemukan halaman HTML dengan <section> elemen mengandung <article> elemen, dan <article> elemen mengandung <bagian> elemen.
Anda juga akan menemukan halaman dengan <section> elemen mengandung <section> elemen, dan <article> elemen mengandung <article> elemen.
 Koran: Olahraga artikel di olahraga bagian, memiliki teknis bagiandi setiap artikel.
HTML5 <header> Elemen
The <header> elemen menentukan header untuk dokumen atau bagian.
The <header> elemen harus digunakan sebagai wadah untuk konten pengantar.
Anda dapat memiliki beberapa <header> elemen dalam satu dokumen.
Contoh berikut mendefinisikan header untuk sebuah artikel:
Contoh
<article>
<header>
<h1>What Does WWF Do?</h1>
<p>WWF's mission:</p>
</header>
<p>WWF's mission is to stop the degradation of our planet's natural environment,
and build a future in which humans live in harmony with nature.</p>
</article>
Coba Sendiri »
HTML5 <footer> Elemen
The <footer> elemen menentukan footer untuk dokumen atau bagian.
A <footer> elemen harus berisi informasi tentang elemen yang mengandung.
Sebuah footer biasanya berisi penulis informasi dokumen, hak cipta, link ke persyaratan penggunaan, informasi kontak, dll
Anda dapat memiliki beberapa <footer> elemen dalam satu dokumen.
Contoh
<footer>
<p>Posted by: Hege Refsnes</p>
<p>Contact information: <ahref="mailto:someone@example.com">
someone@example.com</a>.</p>
</footer>
Coba Sendiri »
HTML5 <nav> Elemen
The <nav> elemen mendefinisikan satu set link navigasi.
The <nav> elemen ditujukan untuk blok besar link navigasi. Namun, tidak semua link dalam dokumen harus di dalam <nav> elemen!
Contoh
<nav>
<a href="/html/">HTML</a> |
<a href="/css/">CSS</a> |
<a href="/js/">JavaScript</a> |
<a href="/jquery/">jQuery</a>
</nav>
Coba Sendiri »
HTML5 <aside> Elemen
The <aside> elemen mendefinisikan beberapa konten selain dari konten itu ditempatkan di (seperti sidebar).
Samping konten harus berkaitan dengan isi sekitarnya.
Contoh
<p>My family and I visited The Epcot center this summer.</p>
<aside>
<h4>Epcot Center</h4>
<p>The Epcot Center is a theme park in Disney World, Florida.</p>
</aside>
Coba Sendiri »
HTML5 <angka> dan <figcaption> Elemen
Dalam buku-buku dan surat kabar, itu adalah umum untuk memiliki keterangan dengan gambar.
Tujuan dari keterangan adalah menambahkan penjelasan visual untuk gambar.
Dengan HTML5, gambar dan keterangan dapat dikelompokkan bersama dalam <figure> elemen:
Contoh
<figure>
<img src="pic_mountain.jpg" alt="The Pulpit Rock" width="304" height="228">
<figcaption>Fig1. - The Pulpit Rock, Norway.</figcaption>
</figure>
Coba Sendiri »
The <img> elemen mendefinisikan gambar, <figcaption> elemen mendefinisikan judul.
Mengapa Semantic HTML5 Elements?
Dengan HTML4, pengembang menggunakan favorit mereka sendiri atribut nama untuk elemen halaman gaya:
header, atas, bawah, footer, menu, navigasi, utama, wadah, konten, artikel, sidebar, topnav, ...
Hal ini membuat tidak mungkin untuk mesin pencari untuk mengidentifikasi konten halaman web yang benar.
Dengan unsur-unsur HTML5 seperti: <header> <footer> <nav> <section> <article>, ini akan menjadi lebih mudah.
Menurut W3C, Web Semantic:
"Memungkinkan data yang akan dibagi dan digunakan kembali seluruh aplikasi, perusahaan, dan masyarakat."
Unsur semantik di HTML5
Di bawah ini adalah daftar abjad dari unsur-unsur semantik baru di HTML5.
Link pergi ke kami lengkap HTML5 Referensi.
TagDescription<article>Defines an article<aside>Defines content aside from the page content<details>Defines additional details that the user can view or hide<figcaption>Defines a caption for a <figure> element<figure>Specifies self-contained content, like illustrations, diagrams, photos, code listings, etc.<footer>Defines a footer for a document or section<header>Specifies a header for a document or section<main>Specifies the main content of a document<mark>Defines marked/highlighted text<nav>Defines navigation links<section>Defines a section in a document<summary>Defines a visible heading for a <details> element<time>Defines a date/time
HTML5 Migrasi
«Sebelumnya
Berikutnya Bab »
Migrasi dari HTML4 ke HTML5
Bab ini sepenuhnya tentang bagaimana bermigrasi dari khas HTML4halaman untuk khas HTML5 halaman.
Bab ini menunjukkan bagaimana mengkonversi halaman HTML4 ke dalam halaman HTML5, tanpa merusak apapun dari konten asli atau struktur.
 Anda dapat bermigrasi ke HTML5 dari HTML4 atau XHTML, menggunakan resep yang sama ..HTML4 khasHTML5 khas<div id = "header"><header><div id = "menu"><nav><div id = "content"><section><div id = "post"><article><div id = "footer"><footer>
Sebuah Khas HTML4 Halaman
Contoh
<!DOCTYPE HTML PUBLIC "-//W3C//DTD HTML 4.01 Transitional//EN" "http://www.w3.org/TR/html4/loose.dtd">
<html lang="en">
<head>
<meta http-equiv="Content-Type"content="text/html;charset=utf-8">
<title>HTML4</title>
<style>
body {font-family:Verdana,sans-serif;font-size:0.8em;}
div#header,div#footer,div#content,div#post
{border:1px solid grey;margin:5px;margin-bottom:15px;padding:8px;background-color:white;}
div#header,div#footer {color:white;background-color:#444;margin-bottom:5px;}
div#content {background-color:#ddd;}
div#menu ul {margin:0;padding:0;}
div#menu ul li {display:inline; margin:5px;}
</style>
</head>
<body>
<div id="header">
<h1>Monday Times</h1>
</div>
<div id="menu">
<ul>
<li>News</li>
<li>Sports</li>
<li>Weather</li>
</ul>
</div>
<div id="content">
<h2>News Section</h2>
<div id="post">
<h2>News Article</h2>
<p>Ipsum lurum hurum turum ipsum lurum hurum turum ipsum lurum hurum turum ipsum
lurum hurum turum.</p>
<p>Ipsum lurum hurum turum ipsum lurum hurum turum ipsum lurum hurum turum ipsum
lurum hurum turum.</p>
</div>
<div id="post">
<h2>News Article</h2>
<p>Ipsum lurum hurum turum ipsum lurum hurum turum ipsum lurum hurum turum ipsum
lurum hurum turum.</p>
<p>Ipsum lurum hurum turum ipsum lurum hurum turum ipsum lurum hurum turum ipsum
lurum hurum turum.</p>
</div>
</div>
<div id="footer">
<p>&copy; 2014 Monday Times. All rights reserved.</p>
</div>
</body>
</html>
Coba Sendiri »
Ubah ke HTML5 DOCTYPE
Mengubah DOCTYPE, dari doctype HTML4:
<!DOCTYPE HTML PUBLIC "-//W3C//DTD HTML 4.01 Transitional//EN" "http://www.w3.org/TR/html4/loose.dtd">
dengan DOCTYPE HTML5:
Contoh
<!DOCTYPE html>
Coba Sendiri »
Ubah ke HTML5 Encoding
Ubah pengkodean informasi, dari HTML4:
<meta http-equiv="Content-Type"content="text/html;charset=utf-8">
untuk HTML5:
Contoh
<meta charset="utf-8">
Coba Sendiri »
Tambahkan The Shiv
HTML5 elemen semantik yang didukung di semua browser modern.
Selain itu, Anda dapat "mengajar" browser lama bagaimana menangani "elemen yang tidak diketahui".
Tambahkan dengan belati untuk dukungan Internet Explorer:
Contoh
<!--[if lt IE 9]>
<script src="http://html5shiv.googlecode.com/svn/trunk/html5.js"></script>
<![endif]-->
Coba Sendiri »
 Baca tentang yang belati di HTML5 Browser Dukungan.
Tambahkan CSS untuk HTML5 Semantic Elements
Lihatlah gaya CSS yang ada:
div#header,div#footer,div#content,div#post {
border:1px solid grey;margin:5px;margin-bottom:15px;padding:8px;background-color:white;
}
div#header,div#footer {
color:white;background-color:#444;margin-bottom:5px;
}
div#content {
background-color:#ddd;
}
div#menu ul {
margin:0;padding:0;
}
div#menu ul li {
display:inline; margin:5px;
}
Duplikat dengan gaya CSS yang sama untuk HTML5 elemen semantik:
Contoh
header,footer,section,article {
border:1px solid grey;margin:5px;margin-bottom:15px;padding:8px;background-color:white;
}
header,footer {
color:white;background-color:#444;margin-bottom:5px;
}
section {
background-color:#ddd;
}
nav ul {
margin:0;padding:0;
}
nav ul li {
display:inline; margin:5px;
}
Coba Sendiri »
Ubah ke HTML5 <header> dan <footer>
Mengubah <div> elemen dengan id = "header" dan id = "footer":
<div id="header">
<h1>Monday Times</h1>
</div>
.
.
.
<div id="footer">
<p>&copy; 2014 W3Schools. All rights reserved.</p>
</div>
untuk HTML5 semantik <header> dan <footer> elemen:
Contoh
<header>
<h1>Monday Times</h1>
</header>
.
.
.
<footer>
<p>© 2014 W3Schools. All rights reserved.</p>
</footer>
Coba Sendiri »
Ubah ke HTML5 <nav>
Mengubah <div> elemen dengan id = "menu":
<div id="menu">
<ul>
<li>News</li>
<li>Sports</li>
<li>Weather</li>
</ul>
</div>
ke semantik HTML5 <nav> Elemen:
Contoh
<nav>
<ul>
<li>News</li>
<li>Sports</li>
<li>Weather</li>
</ul>
</nav>
Coba Sendiri »
Ubah ke HTML5 <section>
Mengubah <div> elemen dengan id = "content":
<div id="content">
.
.
.
</div>
ke HTML5 semantik <section> elemen:
Contoh
<section>
.
.
.
</section>
Coba Sendiri »
Ubah ke HTML5 <article>
Mengubah semua elemen <div> dengan class = "post":
<div class="post">
<h2>News Article</h2>
<p>Ipsum lurum hurum turum ipsum lurum hurum turum ipsum lurum hurum turum ipsum
lurum hurum turum.</p>
</div>
untuk HTML5 semantik <article> elemen:
Contoh
<article>
<h2>News Article</h2>
<p>Ipsum lurum hurum turum ipsum lurum hurum turum ipsum lurum hurum turum ipsum
lurum hurum turum.</p>
</article>
Coba Sendiri »
Hilangkan "tidak lagi diperlukan" <style> elemen:
Contoh
div#header,div#footer,div#content,div#post {
border:1px solid grey;margin:5px;margin-bottom:15px;padding:8px;background-color:white;
}
div#header,div#footer {
color:white;background-color:#444;margin-bottom:5px;
}
div#content {
background-color:#ddd;
}
div#menu ul {
margin:0;padding:0;
}
div#menu ul li {
display:inline; margin:5px;
}
Coba Sendiri »
Sebuah Khas HTML5 Halaman
Akhirnya Anda dapat menghapus <head> tag. Mereka tidak diperlukan dalam HTML5:
Contoh
<!DOCTYPE html>
<html lang="en">
<title>HTML5</title>
<meta charset="utf-8">
<!--[if lt IE 9]>
<script src="http://html5shiv.googlecode.com/svn/trunk/html5.js">
</script>
<![endif]-->
<style>
body {
font-family:Verdana,sans-serif;font-size:0.8em;
}
header,footer,section,article {
border:1px solid grey;
margin:5px;margin-bottom:15px;padding:8px;
background-color:white;
}
header,footer {
color:white;background-color:#444;margin-bottom:5px;
}
section {
background-color:#ddd;
}
nav ul {
margin:0;padding:0;
}
nav ul li {
display:inline; margin:5px;
}
</style>
<body>
<header>
<h1>Monday Times</h1>
</header>
<nav>
<ul>
<li>News</li>
<li>Sports</li>
<li>Weather</li>
</ul>
</nav>
<section>
<h2>News Section</h2>
<article>
<h2>News Article</h2>
<p>Ipsum lurum hurum turum ipsum lurum hurum turum ipsum lurum hurum turum ipsum
lurum hurum turum.</p>
<p>Ipsum lurum hurum turum ipsum lurum hurum turum ipsum lurum hurum turum ipsum
lurum hurum turum.</p>
<p>Ipsum lurum hurum turum ipsum lurum hurum turum ipsum lurum hurum turum ipsum
lurum hurum turum.</p>
</article>
</section>
<footer>
<p>&copy; 2014 Monday Times. All rights reserved.</p>
</footer>
</body>
</html>
Coba Sendiri »
Perbedaan Antara <article> <section> dan <div>
Ada membingungkan (kurangnya) perbedaan dalam standar HTML5, antara <article> <section> dan <div>.
Dalam standar HTML5, yang <section> elemen didefinisikan sebagai sebuah blok elemen terkait.
<Article> elemen didefinisikan sebagai lengkap, blok mandiri elemen terkait.
<Div> elemen didefinisikan sebagai blok anak elemen.
Bagaimana menafsirkan itu?
Dalam contoh di atas, kita telah menggunakan <section> sebagai wadah untuk berhubungan <artikel>.
Tapi, kita bisa menggunakan <article> sebagai wadah untuk artikel juga.
Berikut adalah beberapa contoh yang berbeda:
<article> di <article>:
<article>
<h2>Famous Cities</h2>
<article>
<h2>London</h2>
<p>London is the capital city of England. It is the most populous city in the United Kingdom,
with a metropolitan area of over 13 million inhabitants.</p>
</article>
<article>
<h2>Paris</h2>
<p>Paris is the capital and most populous city of France.</p>
</article>
<article>
<h2>Tokyo</h2>
<p>Tokyo is the capital of Japan, the center of the Greater Tokyo Area,
and the most populous metropolitan area in the world.</p>
</article>
</article>
Coba Sendiri »
<div> di <article>:
<article>
<h2>Famous Cities</h2>
<div class="city">
<h2>London</h2>
<p>London is the capital city of England. It is the most populous city in the United Kingdom,
with a metropolitan area of over 13 million inhabitants.</p>
</div>
<div class="city">
<h2>Paris</h2>
<p>Paris is the capital and most populous city of France.</p>
</div>
<div class="city">
<h2>Tokyo</h2>
<p>Tokyo is the capital of Japan, the center of the Greater Tokyo Area,
and the most populous metropolitan area in the world.</p>
</div>
</article>
Coba Sendiri »
<div> di <section> di <article>:
<article>
<section>
<h2>Famous Cities</h2>
<div class="city">
<h2>London</h2>
<p>London is the capital city of England. It is the most populous city in the United Kingdom,
with a metropolitan area of over 13 million inhabitants.</p>
</div>
<div class="city">
<h2>Paris</h2>
<p>Paris is the capital and most populous city of France.</p>
</div>
<div class="city">
<h2>Tokyo</h2>
<p>Tokyo is the capital of Japan, the center of the Greater Tokyo Area,
and the most populous metropolitan area in the world.</p>
</div>
</section>
<section>
<h2>Famous Countries</h2>
<div class="country">
<h2>England</h2>
<p>London is the capital city of England. It is the most populous city in the United Kingdom,
with a metropolitan area of over 13 million inhabitants.</p>
</div>
<div class="country">
<h2>France</h2>
<p>Paris is the capital and most populous city of France.</p>
</div>
<div class="country">
<h2>Japan</h2>
<p>Tokyo is the capital of Japan, the center of the Greater Tokyo Area,
and the most populous metropolitan area in the world.</p>
</div>
</section>
</article>
Coba Sendiri »
 DevelopersHomeAndroidWearTVAutoDesignDevelopTrainingAPI GuidesReferenceToolsGoogle ServicesSamplesDistributeGoogle PlayEssentialsGet UsersEngage & RetainEarnAnalyzeStories
 Pengkodean karakter default di HTML5 adalah UTF-8.


